I know this hasn’t been updated in forever, but if there is anyone who still checks it. I’m on youtube now.
I’ve actually been doing videos for a couple years, but honestly forgot I still had this blog up.
I know this hasn’t been updated in forever, but if there is anyone who still checks it. I’m on youtube now.
I’ve actually been doing videos for a couple years, but honestly forgot I still had this blog up.
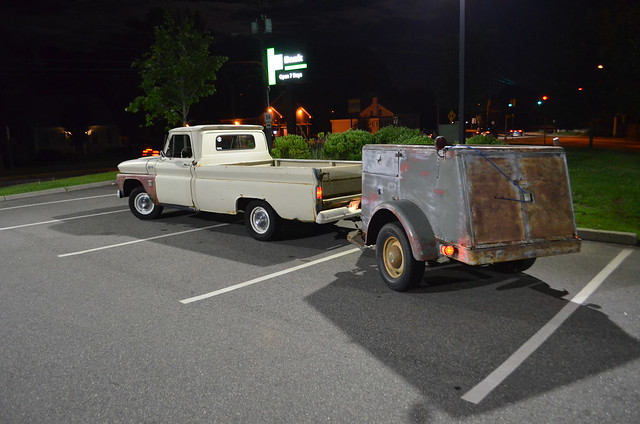
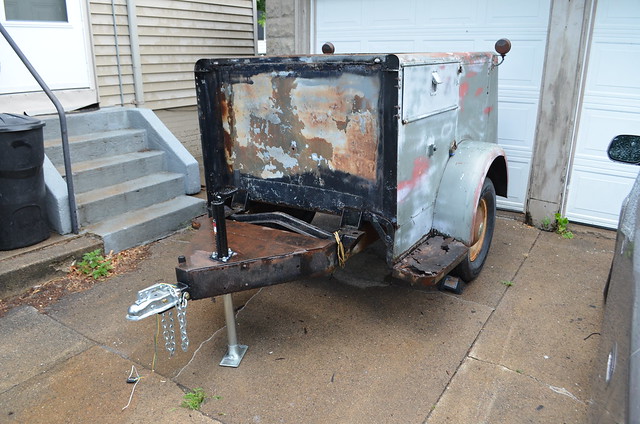
As you may recall, I bought a rusty trailer made from the back half of a Bell Systems utility truck, got it safe to tow, and displayed it at a post-apocalypse themed convention.
Well I wasn’t entirely sure what I wanted to do with it next, needed to put a lot of work into my truck, and recently discovered a house disaster that requires a complete bathroom renovation.
So the trailer was thrown up on Craigslist, and the first person who came to look at it bought it. He’s going to use the box on the custom ‘47 Ford rat-rod pickup he is building for his grandson’s first car. He needs to get a move on with the project too, as the kid is already 18 months old.
I paid $150.00 for it, spent another $227 getting it safe to tow, and ended up selling it for $600. While turning a profit was never my goal, it is nice when I can put more money into the “dumb idea fund” than I took out.
Honestly I’m not sad I sold it. It was a fun & amusing toy, exactly like I’d hoped for when I bought it. But having one less set of projects around the house is probably all for the best right now.
It has been embarrassingly long since the last update, given I’m reporting stuff that actually happened before that update. I blame the mother of all sinus infections, which knocked me on my ass for a month and is still sapping my energy.

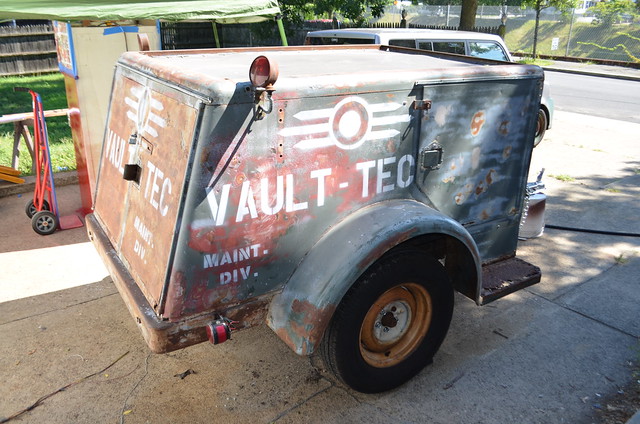
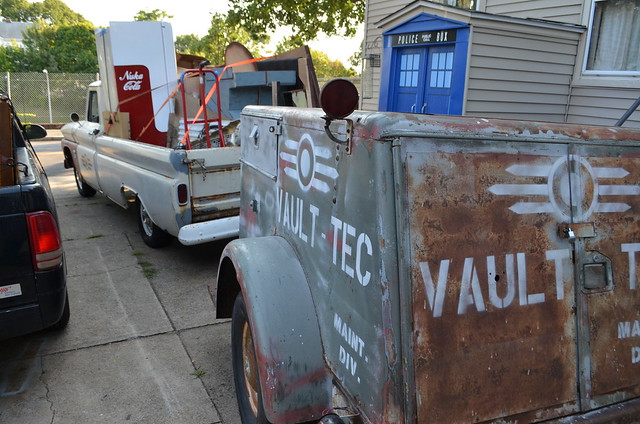
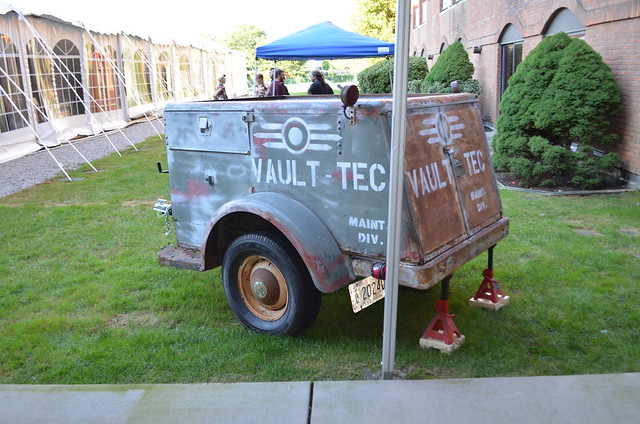
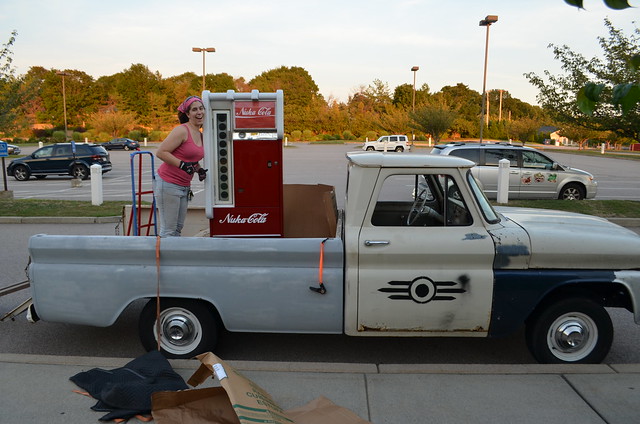
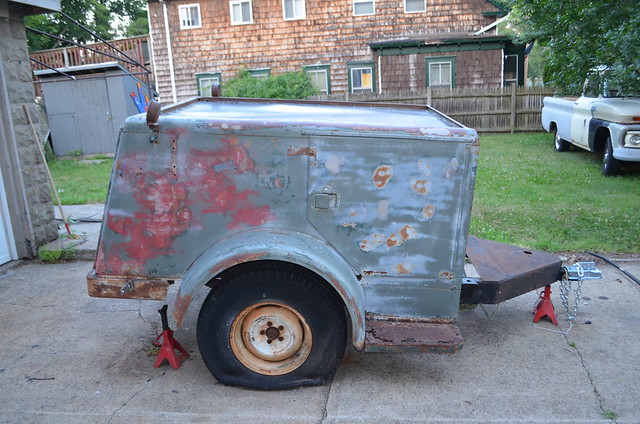
Once I got the trailer safe to tow, it was time to make it look right. I was in charge of props for Templecon, and our theme was post-apocalypse. So in addition to the Nuka-Cola machine, and the vault-door stage backdrop, I decided to letter the trailer up as belonging to Vault-Tec.
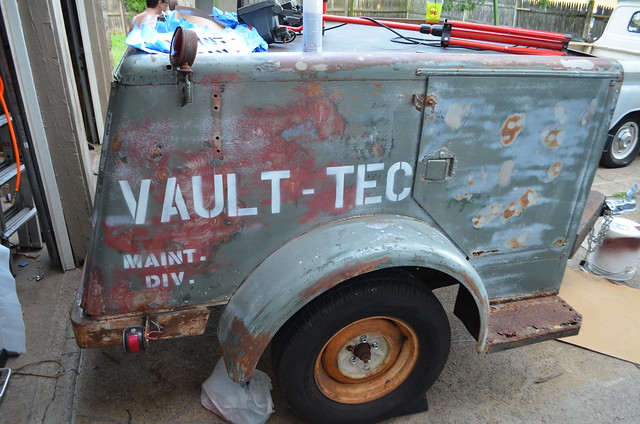
The lettering was simple hardware store stencils. At this point I wasn’t really happy with it and was afraid it was going to look half-assed.

That all changed when I made and applied the stencil for the Vault-Tec logo. that changed the look so much I was downright giddy.
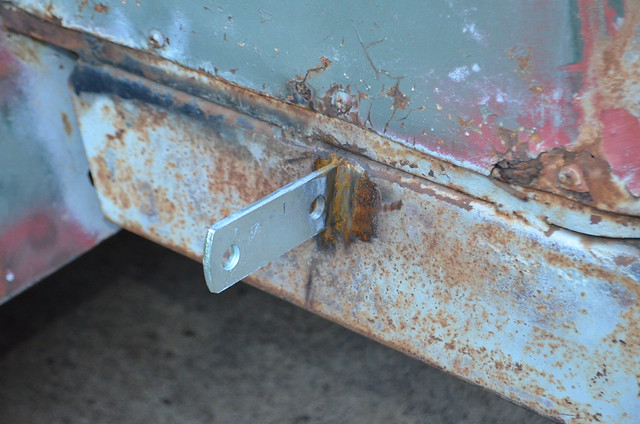
I also quickly tack-welded the ends of the steps to the fenders to keep them from flapping around, and made a loop for the rear lock hasp as the original was cut off. Then it was time to load everything up and head for the convention.
During the convention the trailer was on display as seen in the first pic. In addition to looking cool I used it to store my tools/duct tape/zipties/etc. which came in handy for inevitable disasters on stage and around the con.
Saturday I found a small puddle of water on my bathroom floor where there shouldn’t have been any. Chasing the moisture turned into this:
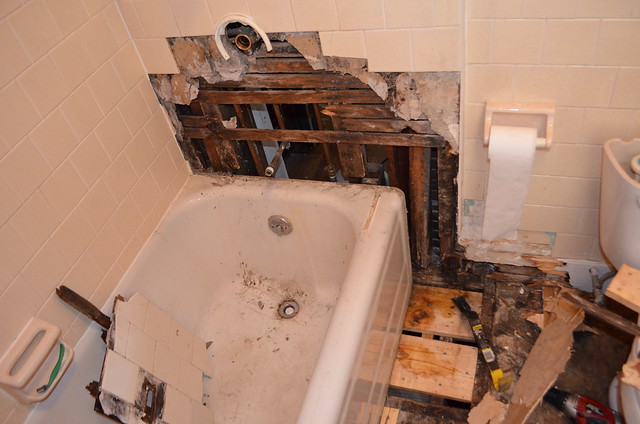
The tub faucet has apparently been leaking, dripping past a terrible past tile installation(plywood instead of backerboard with no sealant at the edge), and running down into the wall.
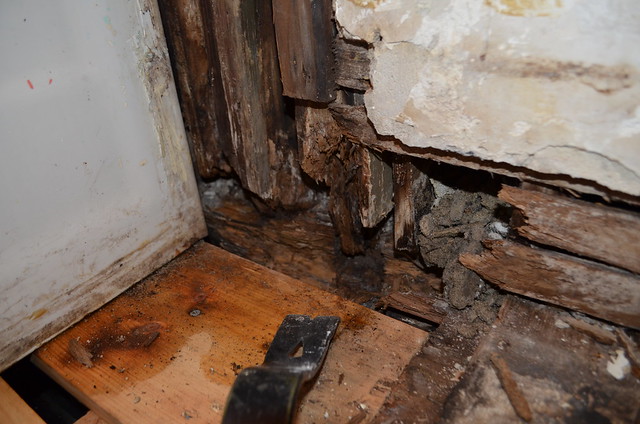
That horizontal there is a sill beam. I won’t even know how bad it is until I get the tub out, which involves ripping out part of two other walls to free it.
SURPRISE! Major bathroom renovation with structural repairs. Oh, you were already renovating another room, replacing the driveline & suspension on your truck, and replacing badly rotted windows before the winter? Tough luck!
I spent this weekend powering through as much of the window & bedroom work as I could so I can clear the deck for gutting & rebuilding this bathroom. The truck however is likely to end up on indefinite hold until this is dealt with.
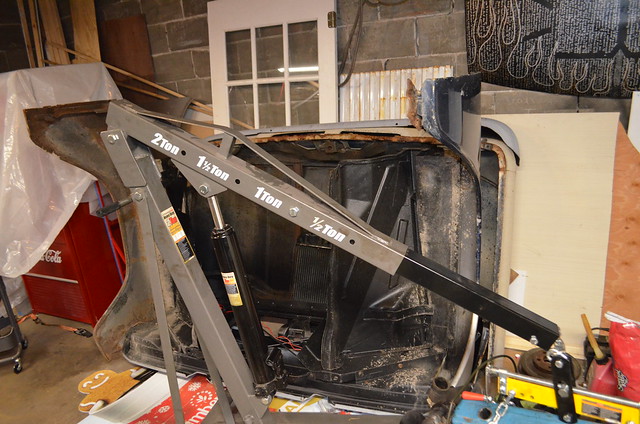
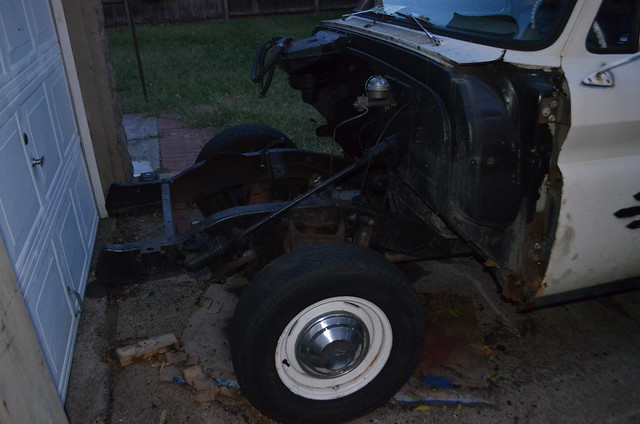
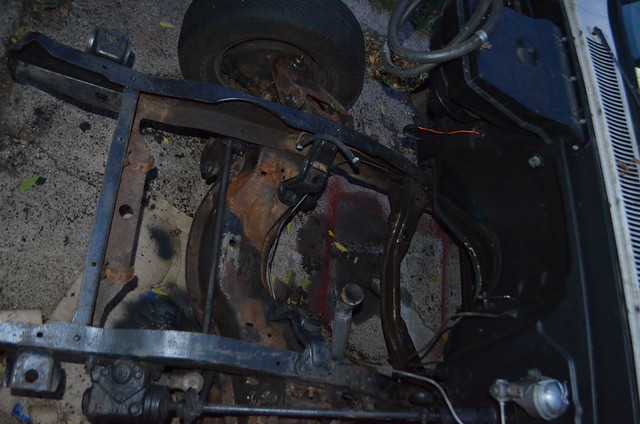
I finally started in on the major truck project that was supposed to happen this spring before I broke my collarbone. I’m pulling the very tired 230 inline and 3-speed and swapping in a 18K mile 250 inline, and a 3-speed with overdrive. I’m also rebuilding the front suspension and adding disc brakes with a 2″ drop.
The day a friend came over and between her, my partner and I we had the hood, bumper and entire front clip pulled in an hour. That went so well we decided to pull the engine & trans while they were there. Disconnecting everything and getting the cherry picker set up took another hour. Then we spent the next 1.5 hours trying to get the driveshaft yoke to slide out of the transmission. It did not want to come out for anything. I ended up ratchet-strapping the engine to the front frame crossmember while it was supported by the cherry picker, then a combination of prying the yoke while someone violently rocked the engine from side to side and the third person trying to tighten the ratchet strap finally pulled it out.
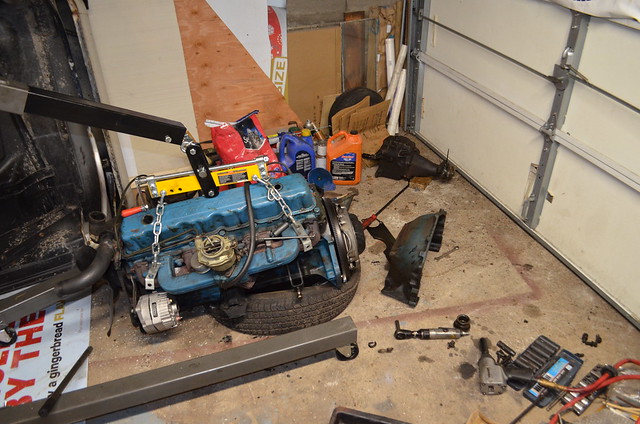
 I separated the engine & transmission to free the bellhousing, the only major component I will be reusing for the “new” drivetrain.
I also got the left suspension stripped off. The only part of the suspension & brakes I’ll be re-using are the upper & lower control arms(with new bushings), the center link, & steering box.
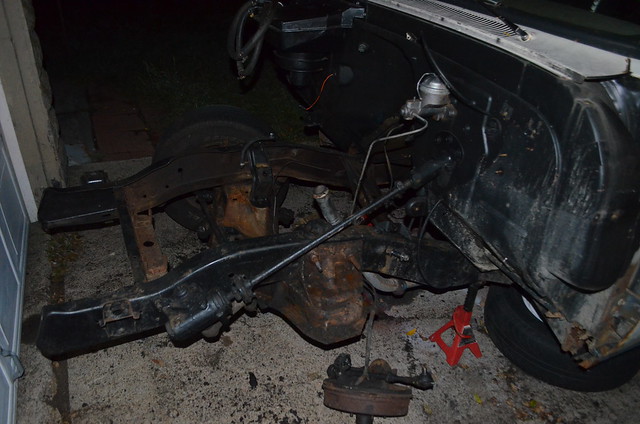
Once all the suspension & brake lines have been stripped off I will be doing major cleaning/degreasing in here, then either grinding or sandblasting the frame for painting before slapping new components on and running new brake lines. Then the new drivetrain can get assembled and installed.
This shouldn’t be a time-consuming project, but a combination of weather, timing and health are conspiring against me, so I’m just hoping I have it buttoned up enough to get the sheetmetal back on by snowfall.
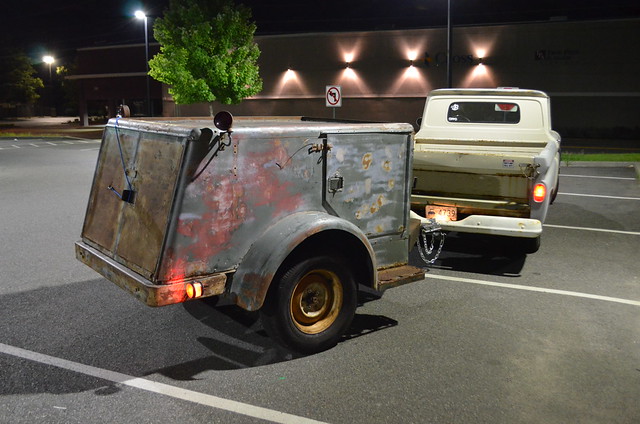
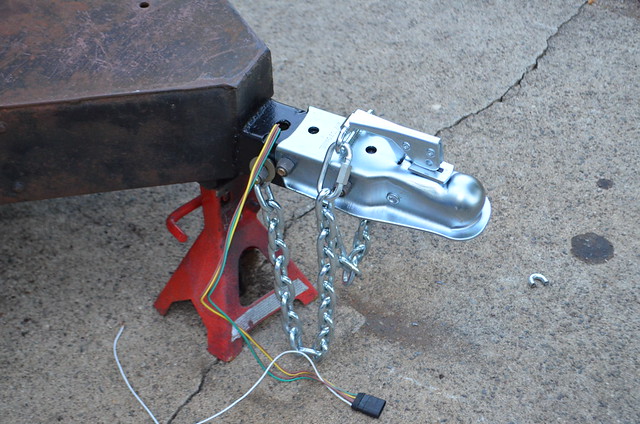
It lives! Or more accurately, it tows! As of the last update I needed to run the wiring and install lights. I finally took care of that, with my awesome partner taking on the job of crawling under the trailer and fishing the wiring.
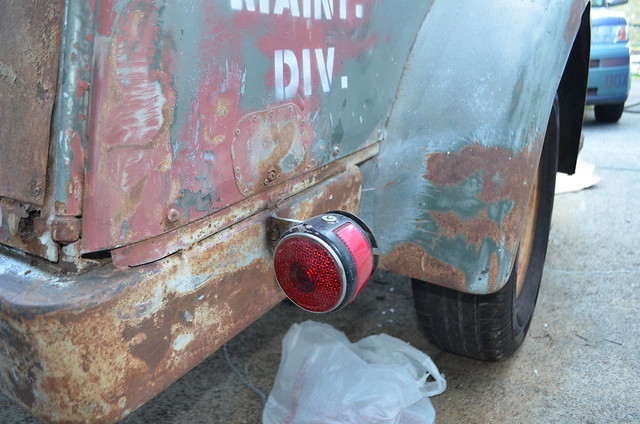
The lights are the ones that came with the trailer, I installed them sideways and tinted the license plate light portions red to give the trailer better side visibility. They are surprisingly bright for ancient lights with cheap bulbs, but I will probably paint the inside of the housings silver and get some red LED bulbs to make them really bright.
I found out the links for the tow chains won’t fit on the loops of the truck’s Curt bumper, so I’ve already upgraded them to larger snap-hooks rated for 2600lbs each.

Prior cost: $368
upgraded chain hooks: $6
electrical connectors, heat shrink, etc. $0(already had)
nuts & bolts to mount lamps: $3
Total: $377
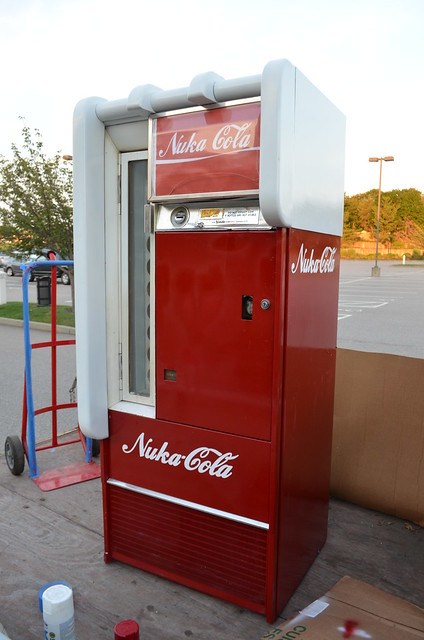
Sometimes I build stuff that amazes even me. This working Nuka Cola machine is one of them. I was in charge of props for Templecon last week here in RI, and our theme was post-apocalypse. So it gave me a chance to build something I’ve been wanting to do for a while, a real Nuka Cola vending machine.
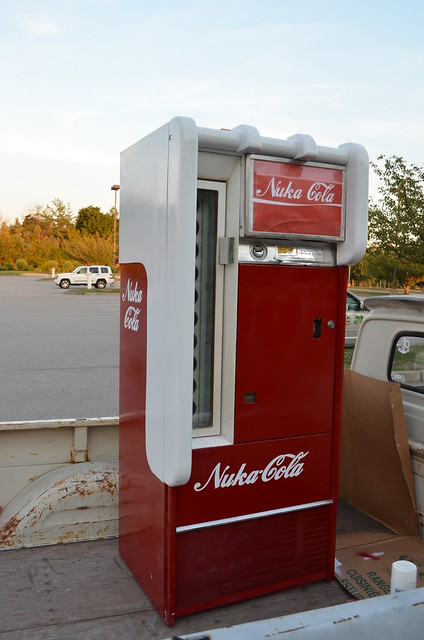
It started with a battered and ugly 1960s Vendo V90 Coke machine I picked up for the princely sum of $90. It was a dirty mess and parts of it had been badly brush-painted at some point. But all the mechanicals worked and it was the right starting shape.
The machine was scrubbed, sanded and primed, and the add-on bits were constructed out of MDF and PVC pipe. I planned to make the top of the machine, complete with small TV screen, but was on too much of a time crunch. So just the front & sides were done. The light up sign on the front was also modified to stick out more to give the machine added dept.
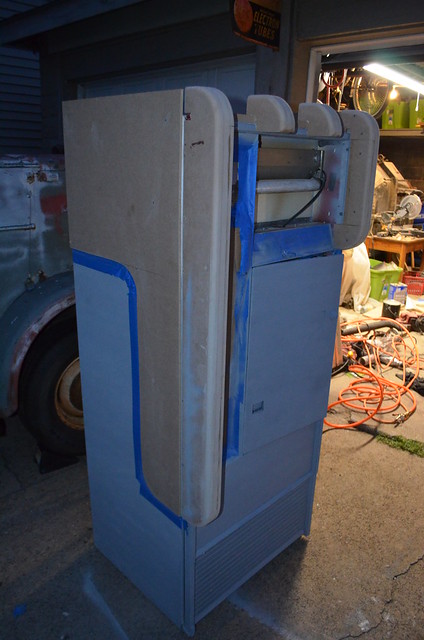
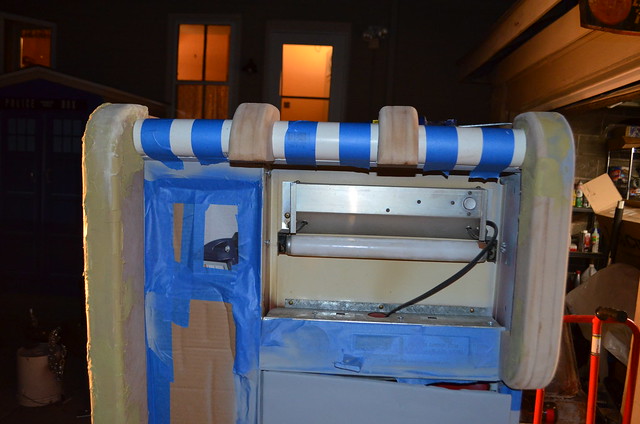
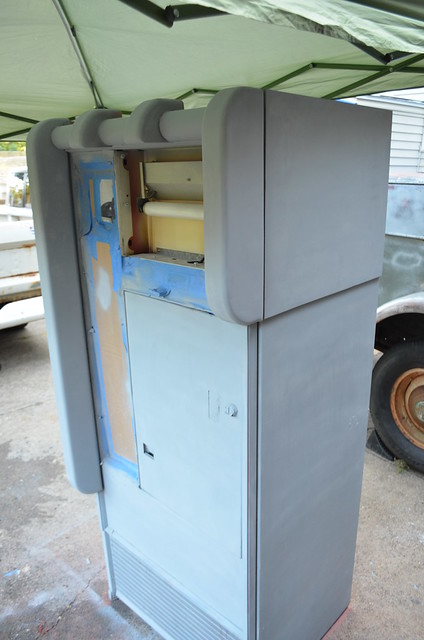
After that it was several layers of body filler and a lot of sanding to get the shape right and seal the wood enough for a glossy paint job.
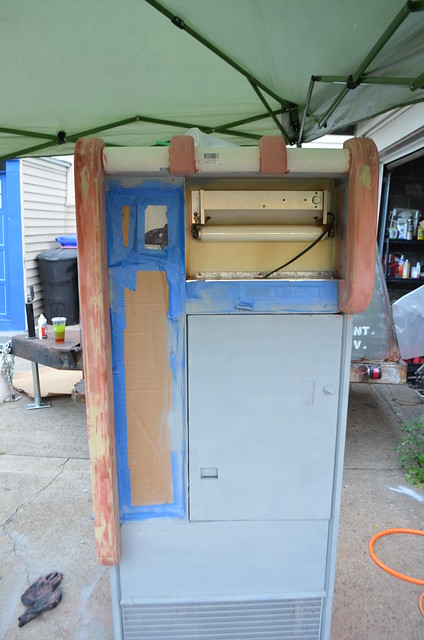
Then primer, more sanding, and more primer. The joke at this point was “Got the 3d model done, now just need to build the textures.”
Then the red went on. You can see my custom painted trailer in the background, more on that in another post.
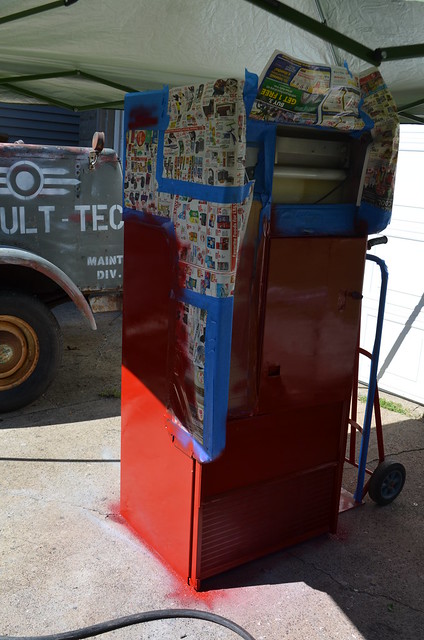
Time was so tight the machine was loaded in my pickup on Monday night(the only time I had enough people to get it in there). The white was masked & painted in the back of the truck that night, and the lettering & front sign were installed Tuesday before heading over to the convention on Wednesday.
My friend Liz, who was a major help in getting everything done in time.
We actually ended up touching up the machine in the parking lot as the paint was so fresh it got scratched from the trip over, despite careful wrapping.
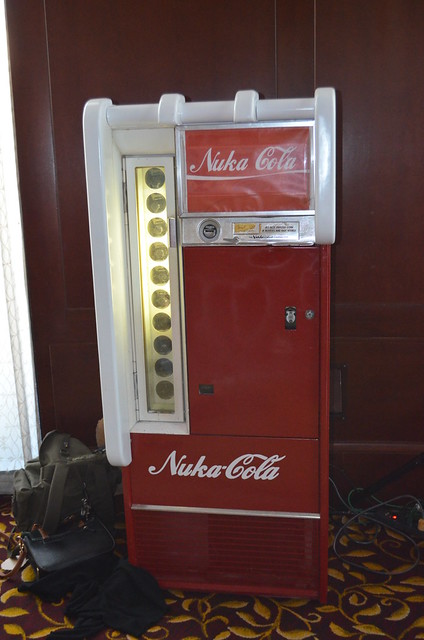
Once in place we loaded it up with bottles of Nuka Cola & Quantum. Sadly the pictures didn’t pick it up, but we had UV LEDs behind the quantum bottles to make them glow.
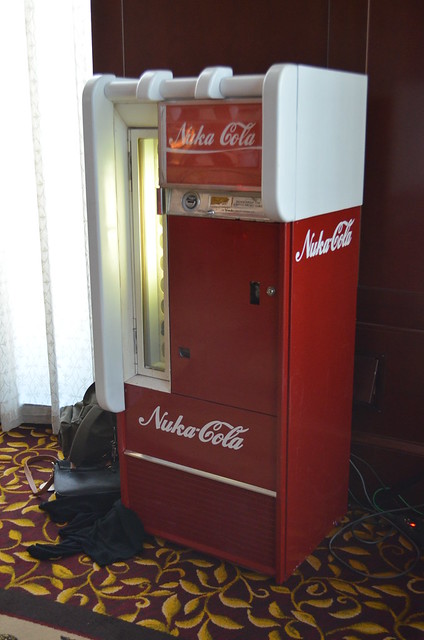
Now that the convention is over the machine is in my garage, waiting for me to decide what to do with it next.
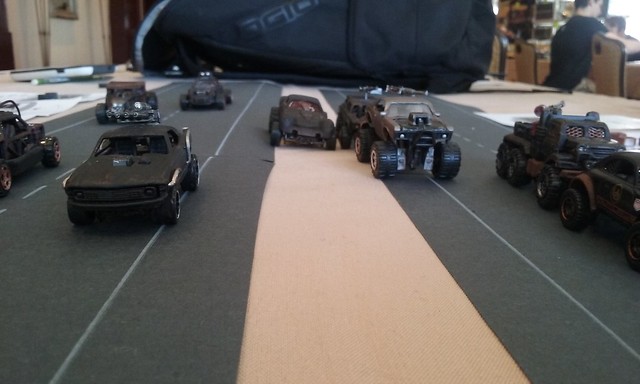
This weekend at a local convention I was able to due the first public beta-testing of my new Fury-Road inspired gaming system “Shattered Highways”.
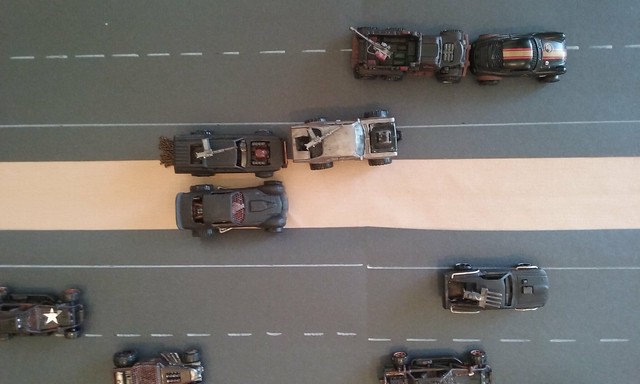
All the sessions went really well, and everyone who played it said they enjoyed it. I found a few things that needed tweaking. But that is the whole point of testing, and I have already modified the rules accordingly.
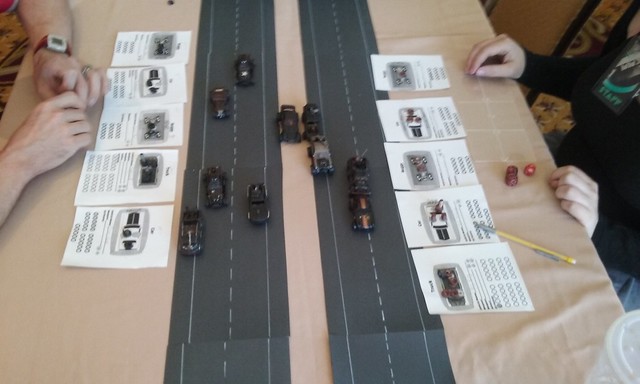
I’m even more excited about the game now, and can’t wait to do more testing & playing, as well as filling out the ruleset.
I don’t have a website for the game up, but you can see the (very much in beta) ruleset here.
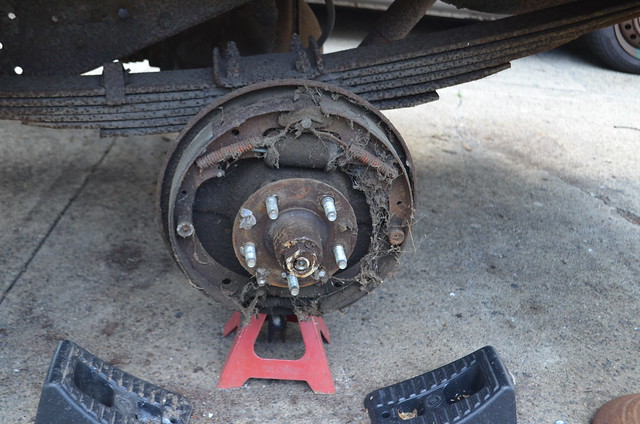
For those interested in the ongoing saga, it is still ongoing, but massive progress was made. I pulled the wheels off the trailer. The driver’s side(above) had no brake drum, but did have recent lug studs & nuts, so that was a pleasant find.
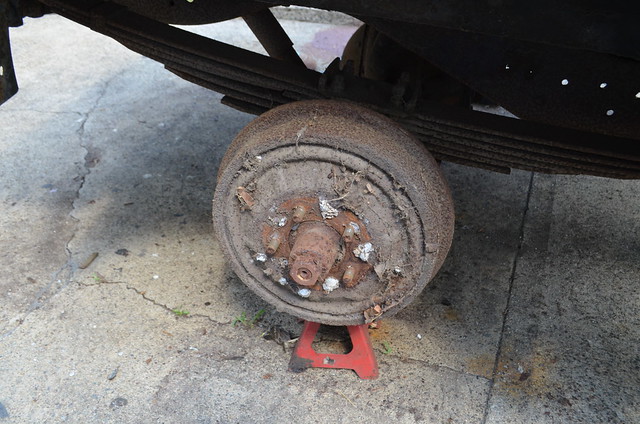
The passenger side required a 2 foot breaker bar with a 3 foot cheater bar. However I didn’t snap any lugs, so it went easily all things considered.
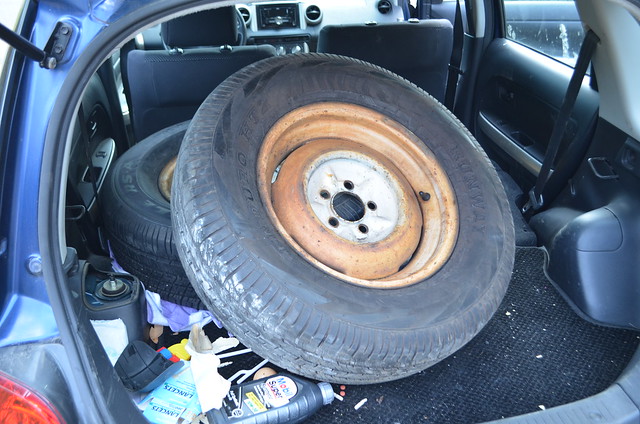
A couple of hours hunting junkyards and used tire shops netted me two mismatched but similar 235/70R16 passenger tires. They should be fine as I’m not planning to do any heavy hauling with the trailer. If I start using it for heavier loads I’ll upgrade to proper heavy duty trailer tires.
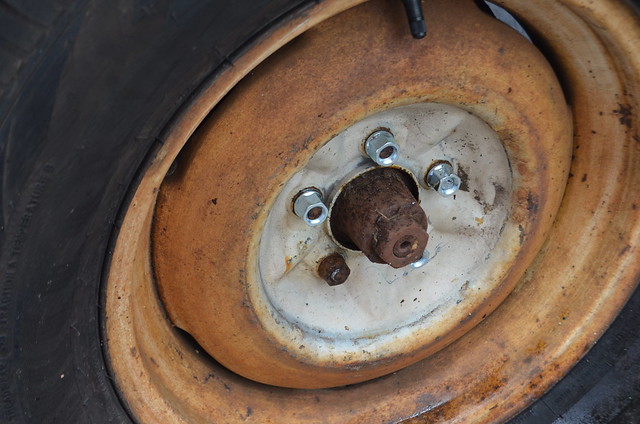
Replaced 4 of the rusted lug nuts as autozone(the only place open at 5pm on Sunday) only had 4 so I need to find another. Or find 5 that are the same style as the far side(these take a different socket size).
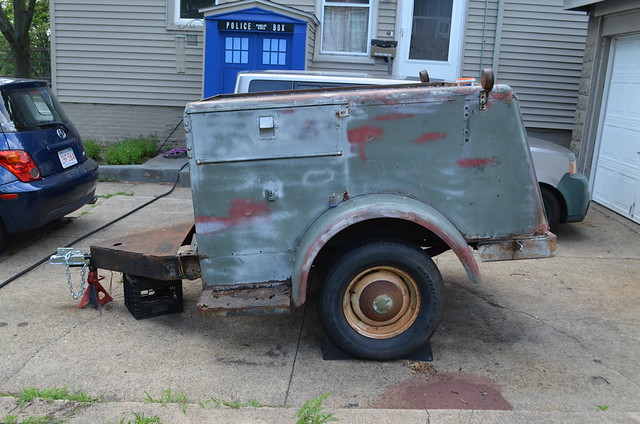
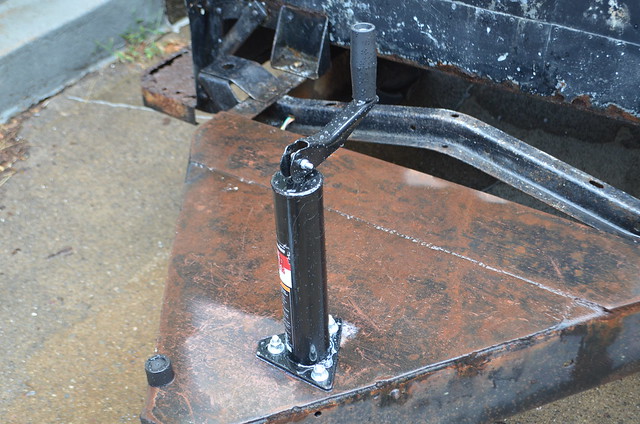
I also installed a Harbor Freight trailer jack. I had to drill one new hole to match the pattern on the new jack. I would have preferred to mount it from underneath so it would be lower(it is at its maximum when the trailer is level, but this was the only way it would both fit and be able to be bolted in place.
So the trailer is now level front to back & side to side, and able to be moved for the first time since it arrived. I will need to add some sort of fold/crank down support at the back as it likes to tip back if you put weight on the bumper.
But for now it is installed & wired lights away from it being legal and safe to tow.
Prior cost: $211
2 used tires $85
mounting tires $35
lug nuts & valve stems $14
trailer jack $23
Total thus far: $368
Picking up where I left off, my partner scrubbed the entire exterior with Simple Green & a Scotchbrite pad. She got some of the white paint off and all of the grime & moss, but it still looks like hell.

While she was at that I cut off the old coupler and safety chains, ground down & repainted the tongue, and installed new ones. The first foot is restored, now I just have to keep working backwards. I also started running new wiring.
I also used some spare brackets that came with the new coupler to make some trailer light mounts. Still need to drill holes to mount the lights to them.
I need to run the wiring & install the lights, then locate some better tires and it will at least be safely towable.
Cost so far:
$150 – Trailer
$35 – coupler
$25 – chains, bolts, links
$1 – scotchbrite pad
$0 – trailer wiring loom(from spares box)
$0 – tail light bracket(spare coupler brackets)
Total: $211