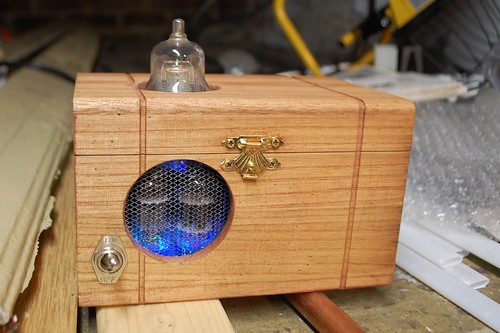
I like to build these little wood boxes studded with vacuum tubes lit by blinking LEDs. I call them “BlinkenBoxes” and they delight me for the simple fact that when you flip the switch they light up and blink, and that is all they do.
A friend has been going through a bunch of difficult stuff recently, and were were going to be getting together with her on a Saturday. That morning I decided to build her a BlinkenBox. So with about three hours before we had to leave, that is what I did. With the time frame I was limited to only things I had on hand, fortunately I keep a lot of random stuff on hand, so I wasn’t lacking for options.

This is what I started with, a simple cheap balsa wood box from a craft store. I bought a few of these a while back with a plan to build a Useless Machine for exactly the same reason I love my BlinkenBoxes, but I never got around to it.
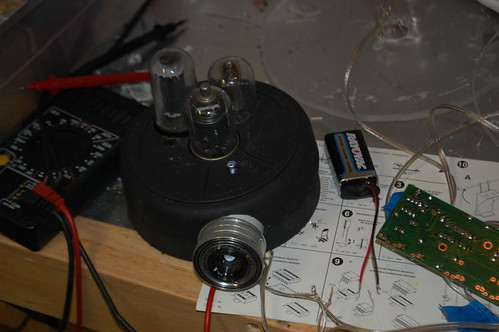
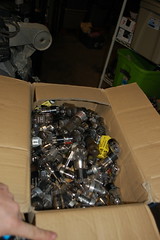 Next up was rooting through my box of vacuum tubes for a few that had the right look. Like many people into steampunk & dieselpunk I love the look of old tubes. I bought this box when I was building Templebot as a huge box full cost only a little more than the few I needed for that project(this same fluke of costs is why I have hundreds of LEDS for a project that needed less than two dozen).
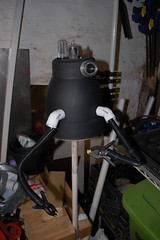
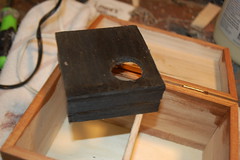
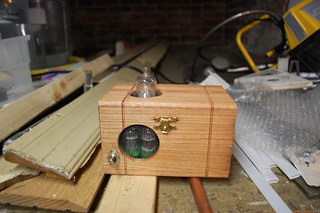
 I decided to have one huge tube sprouting up out of the top of the box, and a window on the front with a few smaller tubes behind it. So out came the hole saw and I attacked the box. I decided to make everything off-center both to make it more interesting, and to make at least part of the inside of the box usable to store stuff. As soon as I’d gotten the holes made, I wiped the box down with some cherry stain left over from restoring the floors in our house. Which went a long way to making the box look fancier than it actually was.
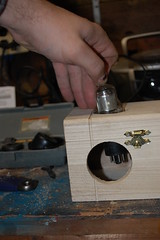
 As you can see from how I was holding the tube in the picture above, I needed something to space it up so it would protrude how I wanted it to. Using some scrap balsa I built a small platform that could hold the tube up, and hide most of the wiring as well. Once it was built it was sprayed flat black to keep it from standing out. I also added a divider between the blinky stuff side and the storage side.
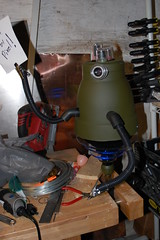
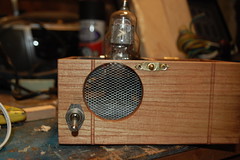 Next up a screen was added to the front “window”, and the switch was mounted. For me the switch is the best part of these, so I use real heavy-duty switches so they have a proper “clunk” feel when thrown. This particular switch was salvaged from my old artcar “Scar” before it was scrapped.
 I wired up the tubes using these excellent LEDs I found on ebay a few years ago. They are RGBs and blink semi-randomly through all three colors on their own. I used the same ones for the tubes in Templebot’s head. The LEDs for the two smaller tubes are actually a bit below the tubes so they would light the whole front of the box, not just the tubes.
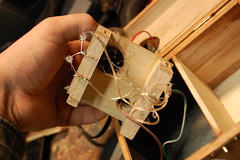 Since I was in a hurry and it was a simple circuit, I use some speaker wire and soldered it together and used hot-glue to insulate the connections. It is ugly, but hidden so it doesn’t matter. Amusingly the only thing I didn’t have on hand for this project was a 9-volt battery. I had to steal one out of a smoke-detector to test the thing, and buy one on the way up to give it to her.
 Once it was wired some final tweaks were done (painting the inside of the compartment black, painting the grill from silver to black to make the tubes more visible, adding a divider so the battery wasn’t visible from the front) and it was done.
And when given to our friend, it got exactly the gleeful response I had been hoping for.