Hatches battened

While House Improbable isn’t in the direct path of Hurricane Tropical Storm Sandy, I’d rather over prepare and look foolish than under prepare and have broken stuff.

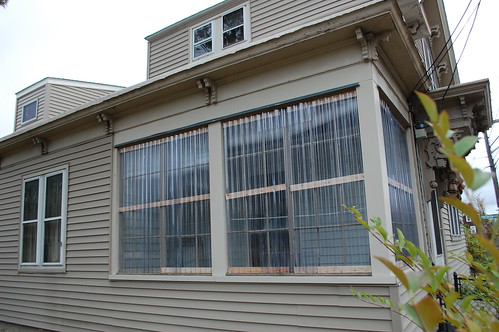
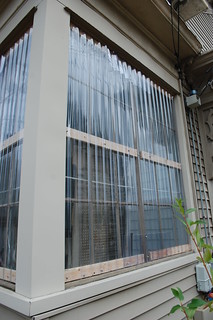
The side porch of our house is in rough shape, much of the glue holding the muntins together is gone, some of the wood is shot and several glass panes areĀ cracked or broken. Since this wouldn’t stand up to a strong breeze, we knew a hurricane would likely wreck havoc upon it. So after a Home Depot trip, we added wood supports across the outside, then screwed corrugated PVC to that. It doesn’t look horrible, should protect the fragile windows, and leaves the porch usable.

Assuming this survives the storm as well as I hope it will, it’ll likely stay on the windows all winter. With any luck it’ll keep the porch warm enough that the ever patient girlfriend can keep her plants out there.

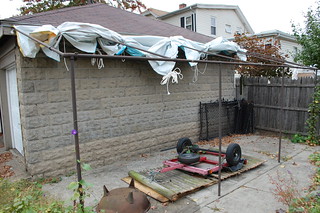
The other prep included tying up the billboard patio awning(one day I will write the post about making this, I swear), and using the wee trailer to weigh down some plywood & fencing I had sitting in the yard. Then all that was left was to stuff the patio furniture & trash cans in the garage and we are ready for the storm.

Quick Tip, installing spark plugs

Here is a quick tip for those who may not have seen this trick. If you are trying to change the plugs in an engine where they are deeply recessed into the head, there is a way to make it much easier.

Use a spark plug socket to take them out, as the rubber donut in the socket will grab the plug and allow you to pull it out.

Or use the hose on your vacuum gauge.

Buy about a foot of vacuum line, and slip one end over the top of the plug. This will allow you to feed the plug down into the head, then twist the line to get the plug started. Once the threads have started the plug will stay in place enough for you to pull the vacuum line off.


Finally use a normal(NOT spark-plug) deepĀ socket to finish the job. As the spark plug socket will want to stay on the plug and likely come off your extension.


Done, and much easier. Oh, you did remember the anti-seize on the plug threads so it is easier next time. Right?

Seduction on four wheels

This absolutely stunning piece of automotive art is the 1939 Rolls-Royce Phantom III “Vutotal” Cabriolet. It is a 1939 Rolls Phantom III Chassis that was rebodied in 1947 by Labourdette of Paris into what you see here.

I was googling for something else and ran across the image above. It immediately beat up my heart and stole its lunch money. Every angle of this car is absolutely achingly beautiful.


The Phantom III “Spectre” Chassis it is built on is no slouch either. From 1934 to 1939 only 719 of them were built at a cost then of about $10,000 each(over $165,000 in today’s money), and that was for the rolling chassis & engine alone. You’d still have to pay to have a body built on the chassis.

The Phantom III was the most advanced Rolls Royce built to date. It had a dual-ignition V-12 engine making an estimated 200 horsepower. A Rolls first independent suspension with hydraulically adjustable shock absorbers and an on-board jacking system.


But this car could be mounted on truck chassis and powered by a lawnmower engine and I wouldn’t care. The art-deco curves are amazing, and the gold plated spears hugging the fenders are almost obscenely sensual. This isn’t rolling sex, sex is messy and people make weird faces. This is rolling seduction. It is the curve of a woman’s body against satin sheets, lit by candlelight.

(via the JWR Automotive Museum)

Amazing what a difference some paint makes

When I bought the truck, it had a terrible set of bias ply tires on it. So the first task was to get some decent radials on it. Not having the $500 for a set of new tires, I spent a few days tracking down a used set and having them mounted.

The wheels however were equal parts black & surface rust. So I put the truck up on jack stands and pulled the wheels.


What then followed was an hour or so of using a wire brush in my angle grinder to make the wheels shiny clean and me a grubby mess of paint flakes & rust dust.


Then went on a coat of etching primer.


And finally a couple coats of gloss white.


Once they were dry I bolted them on. It is amazing how much of a difference they made to the look of the truck. Just compare the picture below to the one at the top of this article. The only change is the wheels.