 The spare tire cover on the wagon was a shattered mess when I got the car, with multiple cracks making it a floppy useless mess. There was even signs that someone else had tried to fix it with epoxy at some point in the past. The only other one I could fine on ebay was $50 and had cracks of its own. So I figured this was a perfect time to try something I’d heard about, plastic welding. The idea is to heat & fuse the plastic together, mixing in a bit of extra plastic as filler, the same way you would use filler rod in regular torch welding. Since the cover was garbage otherwise, I figured I had nothing to lose.
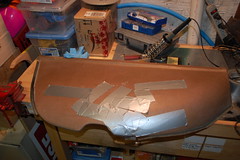 The first thing I did was duct tape the various cracks together. I couldn’t get them to sit tightly closed, but it at least kept the pieces in place enough that the welds wouldn’t pull apart as they cooled. They sell specialized tools for plastic welding, but the tutorials I found online said it could also be done with a soldering iron, which I do have.
 I started out by dragging the tip of the iron across the cracks, sort of tack-welding them together. This was enough to keep the pieces together. Once I had stitched all the various cracks closed like this, it was time for the real “welding.” I shaved a thin strip off the bottom of the cover where it wouldn’t be noticed to use as filler for the welds.
 If you haven’t done any welding, the filler is(in over simplified terms) used to provide enough material to allow the two piece of whatever you are welding together to fuse together. Basically what you do is heat of the material(with the soldering iron in this case), then add the filler and the material & filler flow together and form one solid piece.
In this case I was using the point of the soldering iron the form a V furrow along the crack, and adding filler to the tip of the iron so it would flow into the V welding the two halves together.
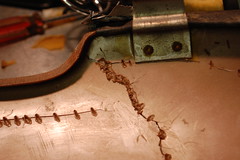
In reality it didn’t go anything like that. It was really clear that the soldering iron is not designed for this sort of thing. What I ended up with in most cases was a line of melted plastic that looked like old chewing gum. However it was holding the piece together pretty well. Even bending the cracks didn’t pull apart.
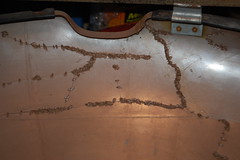
However between the time it took and the fumes making me feel a bit sick I decided I wasn’t going to try and weld every single crack. Instead I welded the major cracks, and spot welded any junctions of cracks or ends of cracks to help hold everything together. In the case of the biggest crack, the one that had been epoxied, the edges were so ragged the crack was still looked open from the outside, so I filled it in with plastic from the outside, it didn’t hide it, but it at least made it less obvious.
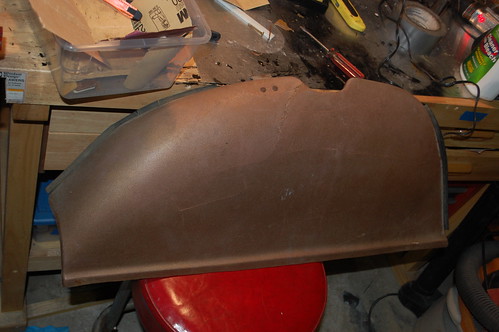
.All told, it came out pretty well. The cracks are still visible as there is no way to get it perfect and the patterning in the plastic make it impossible to fill & sand it smooth. However it is now solid and functional, and when/if I redo the interior I’ll cover it in the same vinyl as the interior.

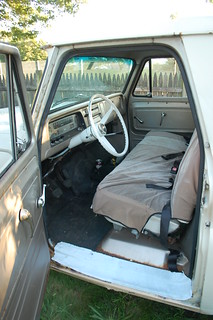 The seat in the ’64 Chevy was a disaster area, and made the cab look like it had been a home to wolverines with a 2-pack a day habit.
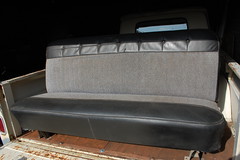 I was surfing the list that is Craig’s one day when I found this bench seat for sale for all of $100. It is from a similar truck but had been custom upholstered. The seller was replacing it with some bucket seats. It was in perfect condition aside from one minor tear in the piping.
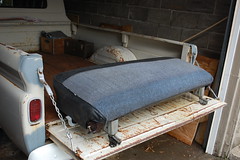 I power-washed the whole thing to get the grime out of all the nooks & crannies. It turns out the tweed portions were once blue, but had faded to the current grey(which I’m ok with, as I prefer the grey). I also painted the brackets on the sides while it was apart.