

What you are looking at was my excuse to play more with wiring, circuits & LEDs. I’ve done a little before but back this last August I wanted to get into it more. Conveniently I’d gotten involved with the Templecon retrofuturist/gaming convention here in RI. We were talking about interesting ways to promote the convention and the 2012 theme of “1950’s post-apocalypse”, and it occurred to me to build a ‘robot’ to bring to other conventions and hold signs/flyers. So off to my favorite toy store(Home Depot) I went.

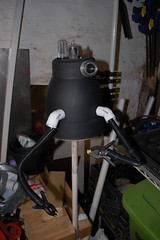
I spent a good long time wandering around looking for something with the right aerodynamic shape. I knew if I had to sculpt something it would take forever, however I ended up getting lucky. The main body is made from, of all things, an upside down flowerpot. Not only that but a cheap one at $2.79 each, so I could hack them up without fear. A few more stops for plumbing bits, drop ceiling support wire, wire loom, MDF board & plexiglass and I was ready to start building.
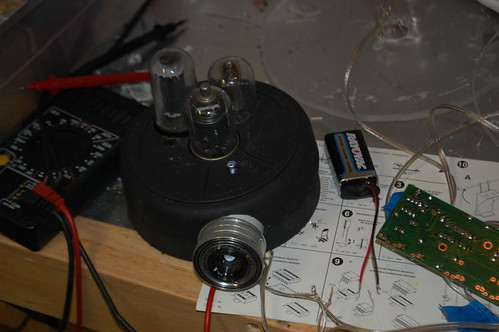
I started with the head, two bases for the flowerpot stacked together gave me the height I needed. The original plan was to ring it with vacuum tubes, but that didn’t look right so found a junk camera for $10 at a flea market and raided it for it’s lens. I mounted the lens to a piece of PVC pipe, and mounted a red LED I’d scavenged from a Nerf gun inside pointing out. The neat part is the iris of the lens still works, so you can adjust the width of the light beam. Three random vacuum tubes became his “brain”, I mounted some LEDs in them I had left over from another project, they blink randomly between three colors and do a good job of looking really complicated for not much effort.
 Some more building got me a torso and two arms capable of bending wherever I need them. The photo at right shows black plastic clamp ‘hands’, but this kept breaking so they were swapped out for metal ones. Now came the hard part. I wanted the bot to appear to be hovering, and to that end the plan was to have several plexiglass rings light up in sequence. I did a lot of reasearch and was frankly daunted by trying to figure out how to make it happen. Then I stopped by “You-do-it” Electronics outside Boston. There I found a $7 solder-it-yourself kit that let you light up to 8 LEDs in sequence. Perfect.
A lot of soldering, and a fair amount of trial and error got me four rings with either 4 or 2 LEDs per ring that all blink in sequence and light to the same brightness.
Once everything was working I carefully assembled the lower half, testing each section before epoxying it to the base(this would bite me in the ass later when one of the rings stopped working). Some final wiring and everything worked well off two 9-volt batteries hidden inside.
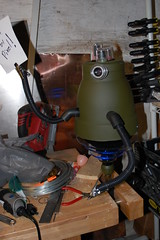
Next I found an appropriately military looking flat green paint and painted it up. A base was welded up out of threaded rod & some flat stock.
After I finished it I dropped it off with my friend Grant, who runs Templecon for a custom post-apocalyptic makeover. After working his magic, the newly christened TempleBot was born.
Click on this pic for a whole set of pics
Soon he was pimping Templcon at various events around the northeast. At Templcon itself TempleBot had a place of honor next to the registration booth. Now that it is over he’s going to decorate my living room.